Tuesday, July 24, 2012

I Have Survived

Last Sunday I was preparing dinner. Spicy meatballs with pasta. I decided to add some chillies. I wasn't concentrating like I should. The knife slipped. The chillies were diced. And two fingers. Well, actually the tips of my second finger and thumb. I laughed it off. But when, two hours later, the bleeding would not stop, my wife insisted I visit the hospital. The photo above was taken in the waiting room, kitchen paper towelling saturated with the red stuff. The result was a couple of days wearing a massive white bandage.
But ... I survived!

Note: after the accident we ate the spicy meatballs and pasta.
Never did find those fingertips.

Wednesday, July 18, 2012

New Vegetable Bed

It's winter. There's not a lot of planting and harvesting to do in the garden, but I'm still pretty busy. I'm back at work, but had the last two weeks off for holidays (benefits of teaching!). I wanted a raised bed for my vegies, so sourced some hardwood timber railway sleepers. People told me that treated pine would be suitable, but I don't feel comfortable growing food near chemical treatments. And hardwood looks great - weathered and natural. Anyway, I found 4 sleepers and positioned them where I wanted the bed to go: near the house but getting full sun. A raised bed is important since drainage in this location is poor.


Once positioned, I needed to level the timbers. I borrowed a spirit level and removed turf from beneath the sleepers until level. 
 
The corners were fixed. I used galvanised plate and screws. A simple job but effective.
 
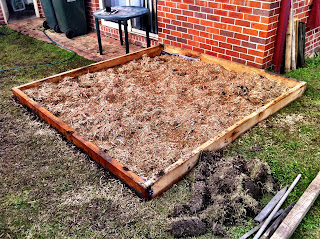
I toyed with the idea of digging up the grass turf inside the bed (the bed was set into a lawn). But instead decided to lay sheets of newspaper: quite thickly (but not too thickly). This should kill the turf and deter weeds. Then a sprinkle of blood and bone. Then a thick layer of sugar cane mulch. This mulch is nice to work with. It's finer than pea straw mulch, and opportunistic peas won't be growing in this bed! You can see the result above, with the newspaper clearly visible.

The mulched bed is above. About 8 feet square. So a possible problem will be reaching the centre of the bed from the edge. It's best not to walk on garden beds too much; compression of topsoil is not a good idea.
So I'll be getting some chunky pavers and laying a small path from the edge into the bed.

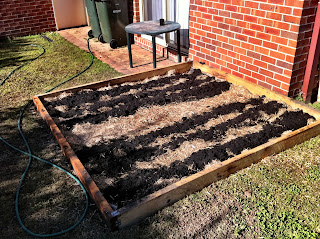
Leaving room for the path, I lay thick strips of compost over the mulch. In this case 6 strips. See above. Into these strips I planted broad beans. Why broad beans? And why not fill the beds with more compost? Broad beans (and all other legumes) can be used as "green manures" - grown, slashed just prior to pod formation (as the flowers are dropping), left on the surface of the beds (perhaps dug in slightly, but not "turned over"). Broad beans are "nitrogen fixers" - they store nitrogen in nodules on their roots. This nitrogen can then be accessed by subsequent plants grown in these beds. When the beans are about a foot high I'll heap more and more compost around them to encourage root formation. So compost will be added to the bed gradually.
And of course the slashed beans will add to the mulch.

Anyway, this vegetable bed will be ready for spring and summer.


You can see broad beans above, to the right of the picture. This is the rest of my vegetable garden mid-winter. These beans are being grown for food, of course. From extreme left to right - lettuce, row of radish, peas under trellis, 4 cabbage, row of chinese cabbage (slugs and snails love these!), broad beans, jasmine on the fence.
Behind the beans, hidden, are plant pots of cabbage.

Ok, hope this was interesting. Remember you can click on any of the photos above for enlargements.
I'm looking forward to planting out my new spring/summer vegetable bed!